The British Flankers Behind Buckman Tavern

Did Pitcairn’s flank guard start the fight?

The post explores the role British flank guards might have played in the morning fight on Lexington Common on 19 April 1775.

A Few Known Facts

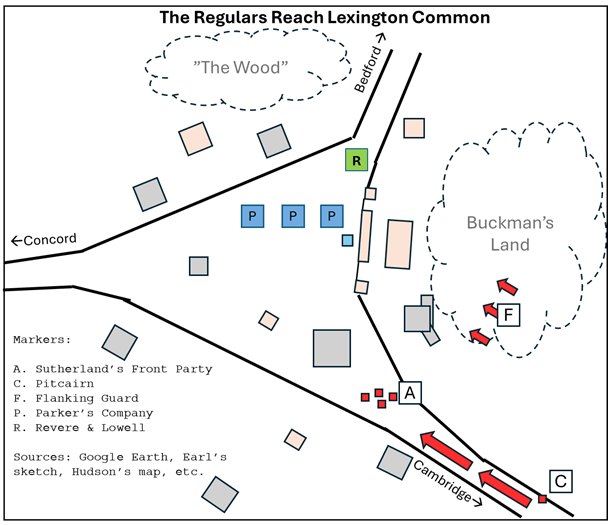
The existence of regular troops flanking the main column of Smith’s forward light infantry detachment (commanded by Major Pitcairn) is documented by Lieutenant William Sutherland, the volunteer from the 38th Foot who led the front party charged with capturing any provincials they met on the road.

Sutherland’s report of the events of 19 April 1775 states that, sometime after daylight, after waiting with prisoners for some time:

We turned back [down] the road we came and found the division, who had halted in consequence of the intelligence [that armed militia awaited them at Lexington] in order to make a disposition by advancing men in front and on the flanks to prevent a surprise.

From Sutherland’s report [Murdock, p16], it seems clear that Major Pitcairn ordered flanking guards on both sides of the road and kept them there as they approached Lexington Common.

Which light infantry troops were deployed? Evidence suggests they were drawn from different companies, since Private James Marr of the King’s Own (4th) Light Infantry was part of the front party led by Lt. Sutherland of the 38th and Lt. Jesse Adair of the Marines. Perhaps the flank guard also consisted of mixed company.

     What did the flank guard do? Light infantry flanking procedures are described in Townshend’s Rules and Orders for the Discipline of the Light Infantry Companies in His Majesty’s Army in Ireland [Smythies, p550]:

The Light Infantry must be careful not to fall into ambuscades when they are marching through a wood or any enclosed country and care must be taken to advance a guard, and to detach flanking parties, the flanking parties to march in front and the files to move at the distance of ten yards from each other, when either of these parties shall discover an enemy they are not to run into the main body but to take posts immediately and begin an attack . . .

From Townshend we conclude Pitcairn’s light infantry flanks were trained to deploy in two-man teams (files) spaced ten yards apart in a line at the front of the main column.

Whether they deployed on 19 April in according with Townsend’s instructions in unknown. Also procedures may have varied between regiments posted in Ireland (the 38th and 5th) and those, say, posted in Canada (the 10th), but it is hard to imagine how the instructions might have materially differed.

What Can We Deduce?

Since marching on a road was invariably easier than through woods and fields, we can imagine the flank guard had a hard time keeping up with Sutherland’s front party. Nevertheless, the final approach from Amos Muzzy’s house to Buckman Tavern supposedly included gardens, orchards and sheep pastures (not heavy woods, steep hills, or impassable rock piles) [Canavan, p123]. We can therefore assume the flanks approached Lexington Common with relative ease, arriving with or shortly after Sutherland, who reportedly first stopped 12-15 rods from Parker’s Company [Phinney, p35], evidently at the road junction below the meetinghouse.

Note: According to Sutherland, Pitcairn also deployed flankers to the left of the main column, who would have ensured no armed militia threatened from the south side of the road. Their role in the morning fight appears negligible, hence we ignore them.

The Right Flank Position

It’s notable that the right flank would have approached the rear of Buckman Tavern and the barn and stables east of Lexington Common, where they would have limited visibility of Parker’s Company. Captain Parker and his men may likewise have been unaware of their presence.

Their Orders

Communication between the main column and the flanks was limited to 1) signals, e.g. played on pipes and drums and 2) messengers. Its reasonable to assume they had different instructions from the main column, both intentionally and simply because they did not see and hear everything with the rest of the troops.

This idea raises several questions.

Did Pitcairn specifically order the flankers not to fire unless ordered (like he did the main column)? All reports suggest the main body of Pitcairn’s detachment did not load until just before reaching the common (after the flankers were ordered out). Likewise Pitcairn’s orders to hold fire unless ordered came then. Did those orders reach the flanks? Were their orders different?

Furthermore, did Pitcairn explicitly prohibit the flanks from discharging their arms if attacked? If not, it stands to reason that Townsend’s instructions to immediately engage the enemy would dictate their actions.

Finally, did the flankers have orders to shoot escaping prisoners and/or British deserters, as provincial stories imply?

Close To The Early Action

The answers to these questions, along with any role the flankers played in the fight, are undocumented. We can, however, make educated guesses on a few key points.

Sutherland’s Three “Rebel” Shots

First, the likely location of the flankers would have made it difficult if not impossible for the provincials to sneak up on Pitcairn’s men from behind the tavern. This casts doubt on Lt. Sutherland’s claim that “rebels” fired on them from the “end” of Buckman Tavern before the main engagement began. The shots he heard fired from that direction were more likely to have come from the flankers than anyone else.
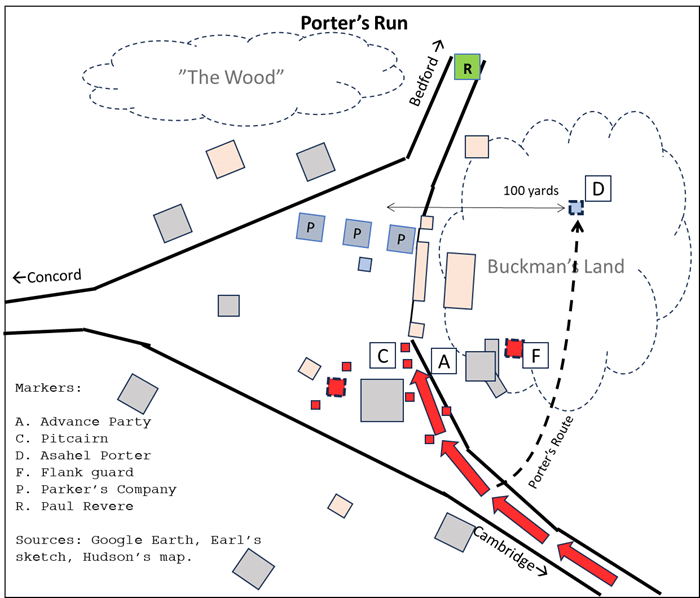
Porter’s Run

Second, troops guarding Pitcairn’s right flank behind Buckman Tavern would have been in position to observe released prisoners Josiah Richardson and Asahel Porter making their way across Buckman’s land toward the trail to Woburn.

According to sources, Porter was shot and killed while running from the main column, either for attempting escape [Phinney, p36] or because he was mistaken for a British deserter [Dean, p9]. Either way, Porter’s path home would have taken him north of the road, straight past the flank guard. Cousins Amos and Ebenezer Lock found Porter shot about a hundred yards (twenty rods) from the common [Phinney, p38-9] as they approached from their Woburn homes to the north [Lock, p68-72].

Given the distance from the main column, it seems most likely the closer flankers gunned him down.
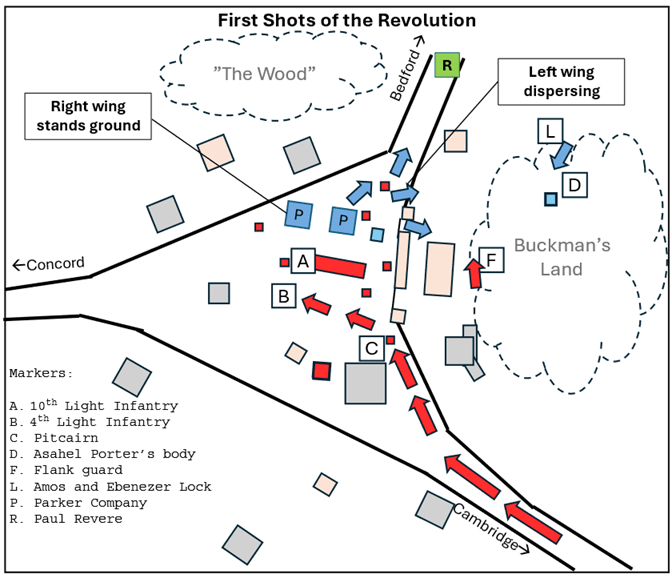
The “First Shots”

Did the flankers advance with the British on the common? This would be in accordance with their training to stay at the front of the column, which had pivoted north. So doing would place them even closer to the Lock cousins when Ebenezer fired at the British on the common [Phinney, p38-9], a shot his descendants claimed was the first of the revolution taken by an American [Bartlett, p1].

Townsend’s rules of engagement suggest the flankers were trained to immediately return fire. If they did, their gunshots may have tipped the already chaotic scene on the common over the edge into open battle.

Meanwhile, Parker’s men—Nathan Munroe and Solomon Brown, among others—were spilling over the wall onto Buckman’s land, seemingly unaware of the flank guard behind Buckman’s barn. The fact that no one was found dead on Buckman’s land supports the idea that the flankers had already discharged their weapons at the Lock cousins, and were in the process of reloading when the provincial retreat began.

While Parker’s men reportedly had time to fire a few shots, whatever reprieve they found proved short lived. Issac Muzzy was found killed behind Viles shoe shop north of Buckman’s land [Harrington, p3], either by the flankers or the King’s Own light infantry charging off the common.

What Is Certain

This is admittedly a great deal of deduction based on precious little evidence. All we know for certain is 1) British Lieutenant Sutherland reported a flank guard had been deployed, 2) our reconstruction of the fight places the early action off Lexington Common on Buckman’s land, precisely where the British right flank would have been, and 3) Light Infantry procedures dictated immediate engagement with an enemy.

     All of which argues the flank guard played a role in starting the first fight of the American Revolution.

Sources:

Bartlett, Benjamin, “Ebenezer Lock”, Granite Monthly, 1890

Canavan, Michael J., The Canavan Papers, Vol 1, 1912

Dean, Silas, Brief History of Stoneham, 1870

Harrington, Levi, An Account of the Battle of Lexington, 1846

Locke, Herbert G., “Amos Locke”, Lexington Historical Society Proceedings, Vol 1, 1889

Murdock, Harold, Late News of the Excursions And Ravages of the Kings Troops, 1927

Phinney, Elias, Battle of Lexington, 1825

Smythies, Captain R. H. Raymond, Historical Records of the 40th (2nd Somersetshire) Regiment, 1894

How Badly Was Lt. Sutherland Wounded?

Lieutenant William Sutherland of the 38th Foot was one of four British officers wounded during the gunfight at Concord’s North Bridge. Sources conflict somewhat on the severity of his wound. How bad was it?

Lieutenant William Sutherland of the 38th Foot was one of four British officers wounded during the gunfight at Concord’s North Bridge. Sources conflict somewhat on the severity of his wound. How bad was it?

The Records

In his report written within days of the fight [Murdock 1927, p21], Sutherland says of his wound:

“I received a shot a little above my right breast which turned me half around . . . I called to Capt. Laurie that I was wounded and came off the best way I could.”

So, Sutherland was hit in the chest and made a less than gallant retreat from the field. Crawling, perhaps.

How badly was he wounded? Sutherland says the wounded officers were “put into two one-horse chairs” for the return march to Boston. Presumably he meant himself included.

Ensign Jeremy Lister of the 10th, who fought beside Sutherland that day even though they belonged to different regiments, says in his 1780s memoir [Murdock 1931, p33] that after the retreat he found “Lt. Sunderland” waiting to be loaded into a boat with the rest of the wounded for the crossing from Charlestown to Boston:

“Lt. Sunderland complained very much I believe he was in violent pain and did not expect long to survive.”

Questioned at home by friends later that night, Lister says [Murdock 1931, p34]:

“I was ask’d whether I had seen Lt Sunderland of 38th Regt when I reply’d I had and supposd by that time he was dead.”

Pressed on the issue, Lister added:

“I imagin’d from the situation he [Sutherland] appeard to me to be in when I saw him last and from his speeches, I suppos’d by that time he was no more.”

By contrast, Lieutenant Frederick Mackenzie’s report of wounded officers [French, p61] includes this line:

“38th Lieut. Sutherland . . . Breast. Slight”

I couldn’t find any further references, but even these require some reconciliation. Mackenzie notes that Sutherland’s wound was “slight” while Lister’s account places Sutherland at death’s door. How can both be true?

The Analysis

Since Sutherland was able to write his own report within a few days of the fight, promoted to captain with months, and ultimately survived the war, we can conclude his wound was not as life threatening as Lister believed on the day.

That said, Lister was the one who saw Sutherland, while Mackenzie—the adjutant of the Royal Fusiliers—merely compiled a report about men he may have barely known. It’s possible that “slight” refers to wounds that would not cause lasting disability or keep an officer from active duty. Two marine officers—Lieuts. McDonald and Potter—received the same note. Remember, this is the army where, even today, broken legs are treated with aspirin.

So, what kind of chest wound causes violent pain, looks fatal, but results in little lasting injury?

It’s possible Sutherland played up his wound, or had difficulty bearing pain, but these options appear out of character for the veteran of the French War campaigns in Germany.

Some have suggested “a little above my right breast” meant a shoulder wound. This seems unlikely. Why would Sutherland describe his own wound as he did (vs. “I received a shot in the shoulder”)? Why would Lister think a shoulder wound would kill Sutherland before the night was out?

The lieutenant’s appearance and words convinced Lister he would die. Sutherland probably thought so himself.

At the time, neither thought Sutherland had a slight wound to the shoulder.

A Fitting Explanation

What if Sutherland had broken ribs?

If a musket ball became lodged in Sutherland’s upper ribcage, cracking or breaking bones, it would cause violent pain with every breath. Observers—even Mister Simms, the surgeon’s mate from the 43rd Foot—might mistakenly assume a punctured lung, a lethal wound. A young non-doctor like Lister might easily deduce from the location of the wound and Sutherland’s suffering that the lieutenant did not have long to live.

Extract the ball with a pair of forceps, however, and both the pain and fear for Sutherland’s life quickly dissipate.

Sutherland would be sore for days but could write a report and soon resume his pre-adventure duties. Mackenzie, learning this, would be justified in writing that Sutherland’s wound was “slight”.

Sources:

French, Allen, A British Fusilier in Revolutionary Boston, 1926

Murdock, Harold, Late News of the Ravages, 1927

Murdock, Harold, The Concord Fight, 1931

Major John Pitcairn: Hero or Villain?

No British officer features in retellings of the Lexington Fight more than Major John Pitcairn. How he is portrayed, however, has changed drastically over time.

For the first 100+ years, narratives depicted him as the villainous commander whose unprovoked order to “Fire! God damn you, fire!” precipitated a “very close, very heavy” fire that turned the running cold war into open hostilities.

These days, Pitcairn is more often cast as the anti-hero who “tried to stop the American Revolution” but was unhappily in command when the men under him “fired without orders.”

A review of the evidence suggests neither characterization is true.

Pitcairn the Villain?

With nearly every retelling through 1900, patriot narratives show Pitcairn riding across the common at the front of his troops, sword in hand, before ordering his men to fire “without provocation”. The fact that Pitcairn denied this deterred no one. In the words of historian J.D. Bell, Pitcairn was “the British officer that rural New Englanders loved to hate”.

Circumstantial evidence, however, suggests Major Edward Mitchell (not Pitcairn) ordered the regulars to open fire on the dispersing militia. For a discourse on that theory, see here.1

If the provincials indeed named the wrong officer, then perhaps the 52-year-old marine and father of ten wasn’t the murderous villain everyone thought he was. But that doesn’t explain how he suddenly became the hero of the story.

Pitcairn the Hero?

Modern retellings have increasingly argued Pitcairn was an admirable man who did everything he could to prevent the Lexington fight, and by extension stave off the whole of the American Revolution. Several facts fuel this interpretation:

  1. Pitcairn’s report to General Gage asserted he repeatedly ordered the soldiers to hold fire and that “four or five shots” from the rebels who jumped over the wall the light infantry “began a scattered fire . . . contrary to the repeated orders of both me and the officers who were present.”
  2. Lt. William Sutherland’s report to Gage stated that Major Pitcairn shouted “Soldiers, don’t fire! Keep your ranks and form and surround them!” moments before firing broke out.
  3. In his diary, Lt. John Barker of the King’s Own Light Infantry Company said that after one or two shots from the rebels, “our men, without any orders, rushed in, fired and put ’em to flight”.

In addition, contemporary historians cite (to me, anyway) evidence the Marine major was well respected by provincials:

  1. Ezra Stiles famously called Pitcairn a “good man in a bad cause.”
  2. Another story from the Shaw family, where Pitcairn quartered in Boston, has Pitcairn averting a duel between Shaw’s son and another officer.

All this supports the notion that Pitcairn was an honorable man who lost control of the men under his command.

Yes, But. . .

Other facts undermine the “Pitcairn the Anti-War Hero” narrative:

  • While Pitcairn may have told his troops to hold their fire, many eyewitnesses reported the British commander immediately fired his own pistol, as did several other officers.
  • John Munro Jr and Levi Harrington both stated the British commander (who they mistakenly called Smith) ordered the eight-soldier advance guard to fire a warning volley over the heads of the provincials.
  • Not all these accounts came from provincials. Captured Private Samuel Lee told Reverend Gordon “it was the talk among the soldiers that Major Pitcairn fired his pistol then drew his sword and ordered the troops to fire”.
  • According to Ensign Henry DeBerniere, Pitcairn ordered the light infantry to surround and disarm the rebels. Since the light infantry had their bayonets fixed (and we know they did because a bayonet killed Jonas Parker) the provincials could be forgiven for thinking they faced a bayonet charge.

All these orders came while Pitcairn was stationed by the meetinghouse, which places them before the rebel shots that British accounts say came after the light infantry crossed the field. So before Major Mitchell shouted “Fire! God damn you, fire!”, Pitcairn played the willing aggressor. (For a fully reconstructed timeline, see here.)

Should we excuse the commander for not foreseeing how the provincials would interpret his actions? Only if we are willing to label him incompetent, and incompetent men make poor heroes.

Also, None of The Provincials Really Knew Him

Claims that the provincials respected Pitcairn also ignore several facts:

  1. Pitcairn arrived in Massachusetts with the marines in December 1774. On the day of the fight, he had only been in Boston four months.
  2. In a February 1775 letter to the Earl of Sandwich, Pitcairn said, “I often wish to have orders to march to Cambridge and seize those impudent rascals that have the assurance to make such resolves. . . We have no orders to do what I wish to do, and what I think may easily be done, I mean to seize them all and send them to England.”
  3. In March, he wrote the Earl, “I am satisfied that one active campaign, a smart action, and burning two or three of their towns, will set everything to rights.”
  4. Also in the March letter, Pitcairn reported he “lived almost night and day amongst the men in their barracks for these five or six weeks past, on purpose to keep them from that pernicious rum.”

So, Pitcairn had only been in Boston for four months when the war broke out and, according to his own report, he spent at least a third of that time in the marine barracks. Assuming he spent most of the remainder with other officers, one has to wonder whether any of the provincials knew Pitcairn at all, much less well enough to judge his character.

One could argue that, at best, Pitcairn made a favorable first (superficial) impression with a few Massachusetts men. What would those men have thought of Pitcairn had they read his letters?

More importantly for modern historians, how might these additional facts have translated into Pitcairn’s actions on Lexington Common? His letters arguably show he shared the same views held by most officers: that Gage was too lenient, that the rebels would yield quickly to a harsh yet necessary action, etc.

So, if Pitcairn tried to prevent the revolution, he did so in the same manner as many other officers: By attempting to cow the provincials into submission through overwhelming force, which is precisely the strategy he employed on Lexington Common.

A strategy that, by the end of that day, had clearly backfired.

    Sources:

    Kehoe, Vincent, “We Were There!”: Compilation of most eyewitness accounts, including those cited: Major Pitcairn, Lt. Barker, and Lt. Sutherland, Ensign DeBerniere, John Munro Jr, Captain William Soutar.

    Publications of the Navy Records Society, Vol LXIX, The Sandwich Papers, Vol I, p57-59

    Levi Harrington’s account of the fight, transcribed by his son after his death, is available from the Lexington Historical Society.

    Endnotes:
    1. Some have argued the provincials misheard and no British officer ever gave the order to open fire never happened. Taking this view requires the rejection of a half dozen eyewitness accounts, including British Marine Captain William Soutar who said the “front company” [the 10th Light Infantry] immediately formed and fired in response to a shout from the leading company [the officers on horseback, among whom Major Mitchell held rank]. It also presumes the troops themselves executed a coordinated “close and heavy” that simultaneously killed and wounded a half-dozen militiamen along the length Parker’s line. ↩︎

    Did Private James Marr Join the Rebellion?

    A records hunt connected a 1780s Continental Army soldier to the Scottish-born British regular captured after the Lexington fight.

    Several captured British regulars made statements published by the Provincial Congress a week after the fight, including Private James Marr of the 4th Regiment (King’s Own) Light Infantry. Some evidence suggests this was the same James Marr who later served in the Continental Army on the patriot side. Did the Scottish-born Marr switch sides?

    Facts:

    • In Reverend Gordon’s 1775 account of the fight, published in the Philadelphia Gazette and elsewhere, he refers to a captured regular: “one James Marr, a native of Aberdeen, in Scotland, of the 4th Regiment”.
    • Ancestry.com currently shows several 1750s baptism records in Scotland for “James Marr”. One from Cluny Aberdeen, 16 Apr 1757 would make James 18 the day of the fight. Another from Saint Nicolas Aberdeen, dated 28 July 1754, would make him almost twenty-one.
    • Revolutionary War Muster Rolls: James Marr listed with men mustered by Nathaniel Barber, Suffolk Co, Boston, June 8 1777, Capt Corey’s Company, Putnam’s regiment. Also descriptive lists dated West Point, 10, Jan 1781: James Marr, Residence: Groton, Stature: 5ft 9in, Complexion: Dark, Hair: Dark, Eyes: Grey, Age: 24 years, 1 month. Listed as a sergeant in 1781.
    • Ancestry.com shows no records for anyone named James Marr born in Suffolk County (Boston) or Worcester County (Groton) where the continental soldier named Marr entered service.

    In the absence of any known James Marr from Massachusetts, and since the Dec 1756 birth date imputed for the “James Marr” in the 1781 West Point records aligns with an April 1757 baptism of the “James Marr” baptized in Cluny, Aberdeen, the odds seem to favor that, following his capture at Concord’s North Bridge, James Marr of the King’s Own joined the rebel cause.

    It’s not clear what happened to the Massachusetts Marr after the revolution. There is no one named James Marr in the 1790 census records for Massachusetts. Several possibilities:

    • The 1790 New Hampshire census has a “James Marrs” living in Alstead Town, Cheshire County, with one female and one young male. Alstead was a new town, incorporated in 1763, so a revolutionary war vet might have found affordable land there.
    • The 1790 New York census records include a “James Marrs” in Ostego Town, Montgomery County with two men and two women.
    • The 1790 Maine census records include a James Marr in Gorham living with three females and one young male, which aligns with a thirtysomething veteran. However several other Marr’s lived there also, which suggests extended family.

    Ancestry records show a “Sergeant James Marrs” died in Indiana in 1814. Some claim that man was from Virginia. No other death records turned up.